Curbside Pickup
17 minute read
Imagine a store running curbside pickup. The retail team manages customer orders in one database and marks an order ready when it’s prepared. Independently, the physical operations team tracks pickup vehicles in another database, and a driver sets their location to Curbside when they arrive. The two systems never talk to each other.
You want a single live view with the panels that matter:
- Orders — every order in PostgreSQL, so one visibly flips from preparing to ready the moment it’s marked ready,
- Vehicles — every vehicle in MySQL, so a car moves from Parking to Curbside as the driver pulls up, and the two situations that actually need a human:
- Matched Orders — lights up the instant an order is ready and its driver is at the curbside, so staff know exactly which order to carry out, and
- Delayed Orders — flags drivers who have been waiting at the curbside too long while their order still isn’t ready.
The catch: the orders live in PostgreSQL and the vehicles live in MySQL, and what you care about — a ready order whose driver has arrived — only exists when you combine a fact from each. Building this the traditional way means polling both databases. Poll the orders and look up each ready one’s vehicle in the other database, and a car pulling up changes nothing until your next orders poll happens to re-check it. Flip it around and poll the vehicles, and now you’re blind to an order flipping to ready. Either way you get reactivity from one side and stale, interval-delayed lookups on the other.
This tutorial builds it on @drasi/lib instead — the Node.js library that embeds the Drasi
continuous-query engine directly in your process. A single Node app connects to both
databases, runs six continuous queries (two of which join across PostgreSQL and MySQL), and
streams the results to a live web UI over
Server-Sent Events.
Drasi watches the change feed of both databases at once, so a change on either side
re-evaluates the join immediately — no polling, no blind side.
Unlike the Drasi Server tutorial this
is based on, there is no separate server to run, no built-in dashboard reaction, and no
separate operations console. Instead, the app embeds the engine and adds Drasi’s SSE
reaction (kind: sse): it shapes each query change with Handlebars templates and streams
it to the browser, driving one integrated UI. That single page is both the dashboard and
the console — it shows the four panels live and carries the buttons that change orders and
vehicles, printing every SQL statement it runs beneath them.
What you’ll build: a running Node app that embeds Drasi over two databases and reacts to changes in either one in real time, assembled from Drasi’s three core building blocks:
| Step | What You’ll Do | Time |
|---|---|---|
| Step 1: Set Up Your Environment | Open the dev container (or install Node + Docker locally) | 5 min |
| Step 2: Run the Demo | One command starts both databases and the app | 3 min |
| Step 3: Open the UI | Watch orders, vehicles, matches, and delays live | 2 min |
| Step 4: Drive Change | Mark orders ready and move vehicles — and watch Drasi react instantly | 5 min |
| How It Works | Understand the two sources, the cross-database join, the six queries, and the SSE reaction | 6 min |
- Terminal: you’ll use one to run the app (it stays in the foreground). Everything else happens in your browser. You can optionally use a second terminal for the helper scripts that change data.
- Working directory: run every command from the tutorial directory
(
tutorials/curbside-pickup/). The dev container opens there automatically; if you’re running locally,cd tutorials/curbside-pickupfirst. - Ports: the web UI is on
3000, PostgreSQL is published on5742, and MySQL on3309. The SSE reaction runs inside the app on8081, but the app multiplexes it into the UI’s/eventsstream, so only3000needs to be reachable.
Step 1 of 4: Set Up Your Environment
This tutorial needs Docker (it runs PostgreSQL and MySQL) and Node.js 18+. The easiest way to get everything is the dev container, which installs it all for you. You can also run locally if you prefer.
Option A: Dev Container or GitHub Codespaces (recommended)
This repo has several tutorial dev containers. Codespaces does not ask which one to use if you click Create codespace on the default Code menu — pick the configuration explicitly (or use the link below).
GitHub Codespaces: Open this Codespaces link (it selects Drasi Node.js — Curbside Pickup Tutorial for you).
Or from the repo page: Code → Codespaces → … next to Create codespace on main → New with options…, set Dev container configuration to Drasi Node.js — Curbside Pickup Tutorial, then create the codespace.
VS Code (local): Open the
drasi-nodejsrepository and run Dev Containers: Reopen in Container. When prompted for a configuration, choose Drasi Node.js — Curbside Pickup Tutorial.Wait for the container to finish. Its setup script installs Node dependencies for the tutorial.
That’s it — skip ahead to Step 2.
Option B: Run Locally
You’ll need Node.js 18+, Docker (for PostgreSQL and MySQL), and bash (for the optional helper scripts; on Windows use Git Bash or WSL). From the repository root, move into the tutorial directory and install its dependencies:
cd tutorials/curbside-pickup
npm install
@drasi/lib ships prebuilt binaries, so there’s no Rust toolchain to install — npm
resolves the correct native addon for your platform. (Intel macOS has no prebuilt binary and
must build from source; see the library docs.)
Step 2 of 4: Run the Demo
Everything runs from a single command. In your terminal, start the demo:
npm run demo
npm run demo does two things: it starts PostgreSQL (seeded with three orders, all
preparing) and MySQL (seeded with three vehicles, all Parking — the plates match the
orders), then runs the Node app in the foreground. MySQL comes up with ROW-based binary
logging and GTID mode enabled, and its init script grants the Drasi user the replication
privileges the source needs.
On first start, the app downloads the Drasi plugins it needs (source/postgres,
bootstrap/postgres, source/mysql, bootstrap/mysql, and reaction/sse) from
ghcr.io/drasi-project with installPlugin, which resolves each one to the build that matches your
platform and this library version, connects to both databases, bootstraps the existing rows, and
starts the six continuous queries and the SSE reaction. When you see this line, it’s ready:
✅ Curbside Pickup is ready — open http://localhost:3000
Leave this running. Everything else happens in your browser (or an optional second terminal).
Press Ctrl+C in the terminal to stop the app. To remove the database containers when you’re
completely done, run bash scripts/cleanup.sh (add --volumes to also delete the data). The
databases keep running between app restarts, so you can stop and start the app freely.
Step 3 of 4: Open the UI
The app serves its own web UI — there’s no separate dashboard or console to build or run.
Wait until the terminal prints Curbside Pickup is ready (the first run takes a little
longer while the plugins download), then open it in your browser:
http://localhost:3000
In the dev container or Codespaces, port 3000 is forwarded automatically — VS Code shows a
notification when the UI is ready, and you can also open it from the Ports panel (the
Curbside UI entry). If you open the page before the app has finished starting, just refresh
once it’s ready.
You’ll see the Curbside Pickup UI, a single page with everything on it:
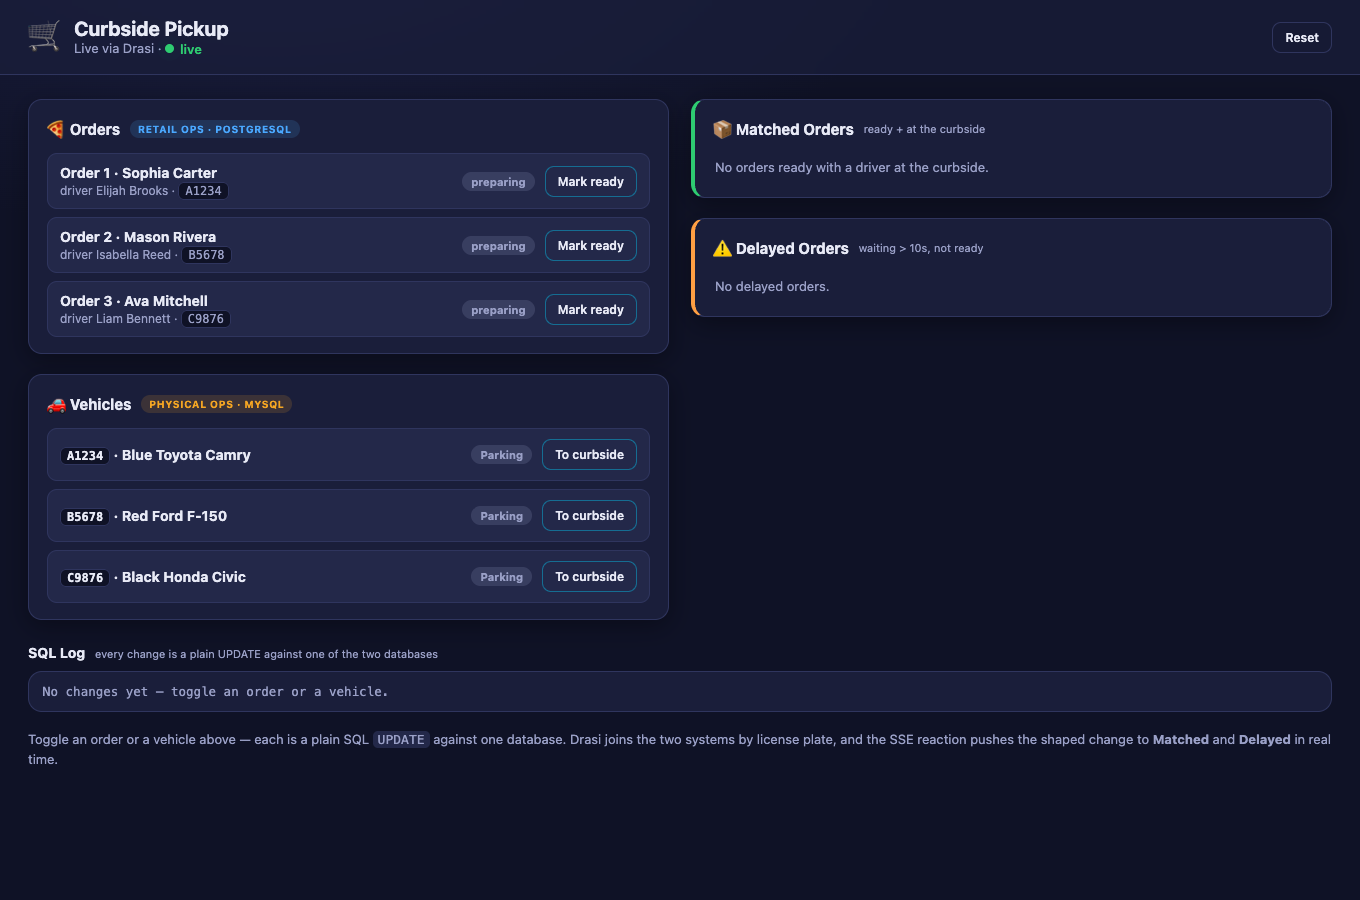
- 🍕 Orders (Retail Ops · PostgreSQL) — every order, each with a badge (preparing / ready) and a button that toggles it. This is both a live panel and the control for the retail side.
- 🚗 Vehicles (Physical Ops · MySQL) — every vehicle, each with a badge (Parking / Curbside) and a toggle button — the control for the physical-operations side.
- 📦 Matched Orders — orders that are ready whose driver is at the Curbside (the
deliveryquery). Starts empty. - ⚠️ Delayed Orders — drivers who have waited at the curbside more than 10 seconds while
their order is still being prepared (the
delayquery). Starts empty. - SQL Log — every change you make is a plain
UPDATEagainst one of the two databases; the log prints each statement, colour-coded by database, so you can see exactly what Drasi is reacting to.
The two left-hand panels are what you drive — each row is one operational record with its current state and a single toggle button:
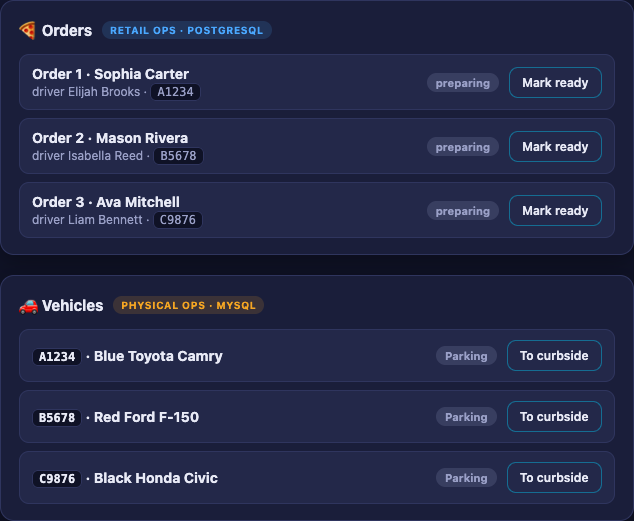
At bootstrap all three orders are preparing and all three vehicles are Parking, so the Matched and Delayed panels start empty and fill in as you drive changes. Every panel updates the instant the data changes — no refreshing.
Step 4 of 4: Drive Change
With the app running and the UI open, change orders and vehicles from the UI and watch Drasi react.
Every button in the UI does exactly one thing: a plain SQL UPDATE — against PostgreSQL for
orders, MySQL for vehicles — exactly what the real retail and physical-operations apps would
do. The button posts to the app, which runs the UPDATE; there’s no event to publish and no
call into Drasi. Drasi observes the row change through PostgreSQL’s logical replication and
MySQL’s binary log, re-evaluates the affected queries, and the SSE reaction re-shapes and pushes
the change on its own. The SQL Log panel shows exactly which statement hit which database.
Trigger a delivery
In the 🍕 Orders panel, click Mark ready on order 1 (Sophia Carter, plate A1234) —
its badge flips to ready. Then, in the 🚗 Vehicles panel, click To curbside on vehicle
A1234 (Sophia’s Blue Toyota Camry).
Within about a second the 📦 Matched Orders panel lights up: order 1 appears with its driver and vehicle. Nothing polled anything — Drasi saw the PostgreSQL change through logical replication and the MySQL change through the binary log, and re-evaluated the cross-database join. The SQL Log shows the two writes that drove it, one per database.
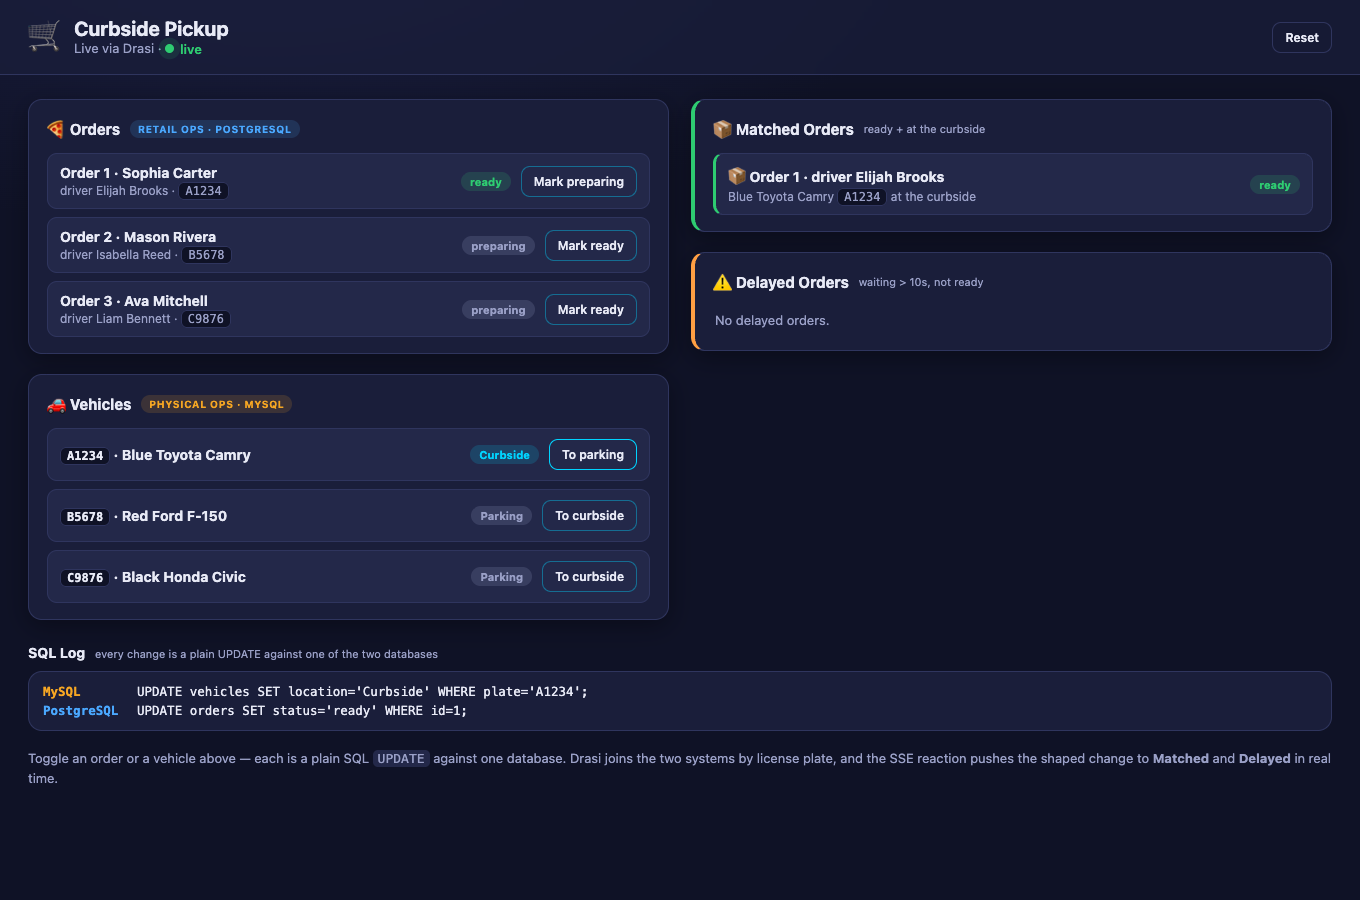
Move the vehicle back to Parking (or mark the order preparing) and the row disappears from Matched Orders — the order is no longer matched to a waiting driver.
Trigger a delay
Now reproduce the other scenario. Click To curbside on vehicle B5678 (Mason Rivera’s Red Ford F-150), but leave order 2 as preparing. Nothing happens immediately. After 10 seconds the ⚠️ Delayed Orders panel lights up: order 2 appears, flagging that the driver has been waiting too long.
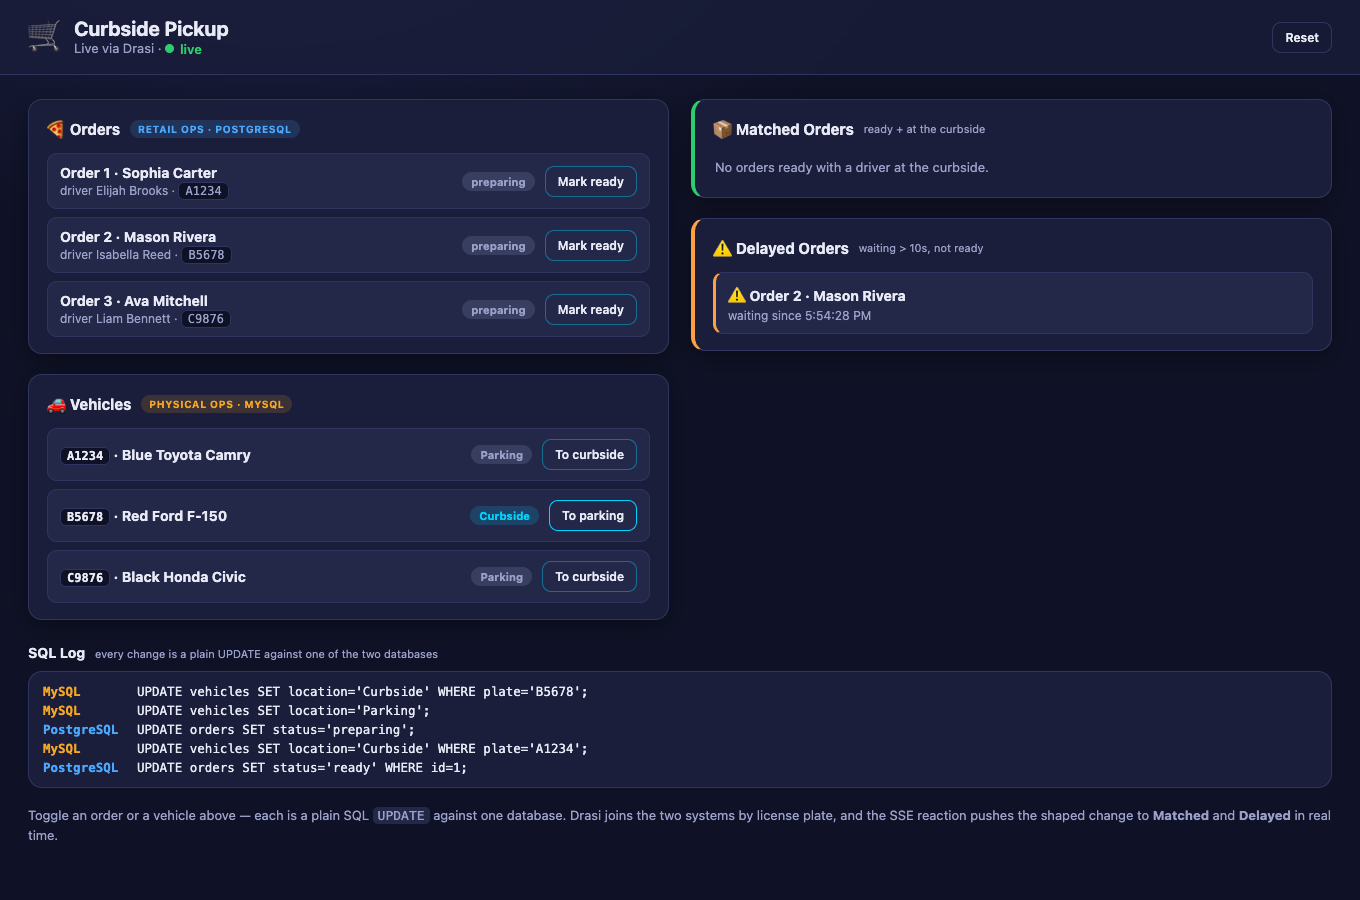
This is the interesting one. Drasi doesn’t poll to find slow orders — the continuous query schedules its own future re-evaluation for the moment the 10-second threshold is crossed, and fires exactly then. If you mark the order ready (or send the driver back to Parking) before the 10 seconds elapse, the alert never appears.
Reset
Return everything to the starting state — all orders preparing, all vehicles Parking — with the Reset button in the header. The Matched and Delayed panels clear.
Because every change is just a database write, you can drive the same reactions with psql and
mysql from a second terminal — no app endpoint involved:
# Order (PostgreSQL / Retail Ops): mark order 1 ready
docker exec curbside-pickup-nodejs-postgres \
  psql -U drasi_user -d RetailOperations \
  -c "UPDATE orders SET status = 'ready' WHERE id = 1;"

# Vehicle (MySQL / Physical Ops): move A1234 to the curbside
docker exec curbside-pickup-nodejs-mysql \
  mysql -u drasi_user -pdrasi_password PhysicalOperations \
  -e "UPDATE vehicles SET location = 'Curbside' WHERE plate = 'A1234';"
Watch Matched Orders react exactly as if you had clicked the buttons.
How It Works
Everything you just ran is a single Node app under tutorials/curbside-pickup/. One file,
index.mjs, embeds the engine, builds the topology over both databases, wires the SSE
reaction, and serves the UI (the browser front end lives in public/). Here’s what each part
does.
Two Sources
The queries join data from two different databases, so the app declares two CDC sources:
PostgreSQL holds the orders and streams changes via logical replication (CDC):
await engine.addSource('postgres', 'retail-ops', {
  host: 'localhost',
  port: 5742,
  database: 'RetailOperations',
  user: 'drasi_user',
  password: 'drasi_password',
  tables: ['orders'],
  slotName: 'drasi_curbside_slot',
  publicationName: 'drasi_curbside_pub',
  tableKeys: [{ table: 'orders', keyColumns: ['id'] }],
}, true, { kind: 'postgres', config: /* same */ });
MySQL holds the vehicles and streams changes via its binary log (binlog). The tutorial
container has no TLS, so the source connects with sslMode: 'disabled', and the MySQL bootstrap
provider takes its own connection block:
await engine.addSource('mysql', 'physical-ops', {
  host: 'localhost',
  port: 3309,
  database: 'PhysicalOperations',
  user: 'drasi_user',
  password: 'drasi_password',
  sslMode: 'disabled',
  tables: ['vehicles'],
  tableKeys: [{ table: 'vehicles', keyColumns: ['plate'] }],
}, true, { kind: 'mysql', config: /* the bootstrap provider's own settings */ });
Each table row becomes a graph node: orders rows become orders nodes and vehicles rows
become vehicles nodes, matching the (o:orders) and (v:vehicles) patterns in the queries.
The Synthetic Join
There is no foreign key between the two databases — they’re completely separate systems. Drasi
creates the relationship in the query with a synthetic join, matching a vehicle to an order
whenever their plate values are equal:
const PICKUP_BY = {
  id: 'PICKUP_BY',
  keys: [
    { label: 'vehicles', property: 'plate' },
    { label: 'orders', property: 'plate' },
  ],
};
The join queries then walk that relationship with (o:orders)-[:PICKUP_BY]->(v:vehicles) as if
it were a real graph edge — across two different databases.
The Six Continuous Queries
Four of the queries are simple single-source lists, filtered by state. Because each one matches
only part of the table, a row leaves one query’s result and joins another’s the instant its
status or location changes — which is what makes it move between panels. orders-preparing and
orders-ready split the PostgreSQL orders by status:
MATCH (o:orders)
WHERE o.status <> 'ready'          // orders-ready uses: o.status = 'ready'
RETURN
  o.id AS id,
  o.id AS orderId,
  o.customer_name AS customerName,
  o.driver_name AS driverName,
  o.plate AS plate,
  o.status AS status
and vehicles-parking and vehicles-curbside split the MySQL vehicles by location:
MATCH (v:vehicles)
WHERE v.location = 'Parking'        // vehicles-curbside uses: v.location = 'Curbside'
RETURN
  v.plate AS id,
  v.plate AS plate,
  v.make AS make,
  v.model AS model,
  v.color AS color,
  v.location AS location
The other two join across both databases. delivery returns an order whenever it is
ready and its driver’s vehicle is at the Curbside. Because every order starts preparing
and every vehicle starts Parking, a row only appears once real changes move an order to ready
and a vehicle to curbside — so the panel starts empty and fills in as changes are driven live:
MATCH (o:orders)-[:PICKUP_BY]->(v:vehicles)
WHERE o.status = 'ready'
AND v.location = 'Curbside'
RETURN
  o.id AS id,
  o.id AS orderId,
  o.driver_name AS driverName,
  o.plate AS vehicleId,
  v.make AS vehicleMake,
  v.model AS vehicleModel,
  v.color AS vehicleColor,
  drasi.listMax([drasi.changeDateTime(o), drasi.changeDateTime(v)]) AS readyTimestamp
delay returns an order whose driver has been at the Curbside for more than 10 seconds
while the order still isn’t ready. It uses drasi.trueFor, which schedules a future
re-evaluation and fires the moment the condition has held for the given duration, so the order
appears exactly when the 10-second threshold is crossed:
MATCH (o:orders)-[:PICKUP_BY]->(v:vehicles)
WHERE o.status <> 'ready'
AND drasi.trueFor(v.location = 'Curbside', duration({ seconds: 10 }))
RETURN
  o.id AS orderId,
  o.customer_name AS customerName,
drasi.changeDateTime(v) AS waitingSinceTimestampBoth the PostgreSQL and MySQL sources stamp every change with the wall-clock time it happened,
which drasi.changeDateTime() exposes. drasi.trueFor uses that timestamp to anchor its
10-second timer — so the delay query fires exactly when a curbside vehicle has waited long
enough — and the delay panel reports it as waitingSinceTimestamp, with no extra timestamp
columns or application bookkeeping required.
All six queries are registered the same way, each with the sources it reads and (for the join
queries) the PICKUP_BY join:
await engine.addQuery('delivery', deliveryCypher,
  ['retail-ops', 'physical-ops'], 'cypher', [PICKUP_BY]);
The SSE Reaction (kind: sse)
This is where the Node version differs most from the Drasi Server tutorial’s dashboard
reaction — but it’s the same built-in SSE reaction the
Getting Started tutorial uses. The
app loads the reaction/sse plugin from the OCI registry and adds it with
addReaction. The reaction opens an
HTTP endpoint and streams each subscribed query’s result changes to the browser over
Server-Sent Events.
Crucially, the SSE reaction shapes each change with a Handlebars template before sending it
— no reaction code of our own required. Each query gets its own routes entry with added /
updated / deleted templates that rename the raw query columns into the clean JSON contract
the UI wants:
await engine.addReaction('sse', 'curbside-sse', Object.keys(routes), {
  host: '0.0.0.0',
  port: 8081,
  heartbeatIntervalMs: 15000,
  routes: {
    delivery: {
      added:   { path: '/delivery', template: '{"op":"add","row":{"id":{{json after.id}},"orderId":{{json after.orderId}},"driverName":{{json after.driverName}}, ... }}' },
      updated: { path: '/delivery', template: '{"op":"update","row":{ ... }}' },
      deleted: { path: '/delivery', template: '{"op":"delete","row":{"id":{{json before.id}}}}' },
    },
    // ...one entry per streamed query (orders-preparing, orders-ready,
    //    vehicles-parking, vehicles-curbside, delay)
  },
});
{{json ...}} is one of the reaction’s Handlebars helpers; it serializes each value as valid
JSON. In the code, a small sseRoute(path, shape) helper turns each query’s row shape into
those templates, and the same shapes drive a matching reshaper for the initial snapshot — so the
browser sees an identical payload whether it arrives as a live change or in the seed.
Because SSE only carries changes from the moment a client connects, the app also serves the
current state once at GET /api/state (built from getQueryResults, shaped through the same
contract). The browser seeds from that snapshot, then applies live deltas.
Finally, the SSE reaction serves each query on its own route. Rather than have the browser open
one EventSource per route — which, with the browser’s ~6-connections-per-host HTTP/1.1 limit,
would eat into the connections the control fetch()es need — the app opens all of those routes
itself and multiplexes them into a single same-origin stream at GET /events.
Each forwarded event is tagged with its stream path
({ "path": …, "msg": { op, row } }). Node has no such per-host limit, and only one port needs
forwarding in Codespaces or a dev container.
The Integrated UI
The front end (public/) is a single HTML page with vanilla CSS and JavaScript — no build
step. On load it seeds itself from /api/state, then opens one EventSource at /events and
merges each { op, row } change into the map for its path:
const source = new EventSource('/events');
source.onmessage = (e) => {
  const { path, msg } = JSON.parse(e.data); // path names the stream
  const { op, row } = msg;
  const map = state[path];
  if (op === 'delete') map.delete(row.id);
  else map.set(row.id, row);
  render();
};
It renders the four panels straight from those streams — Orders and Vehicles are each
the union of their two filtered queries, and Matched / Delayed come from the join and
temporal queries. Each row is produced by a small template literal that maps the shaped fields
onto markup. The order row is representative — it carries the toggle button, tagged with the
data-order attribute the click handler reads to know what to update:
function orderRow(o) {
  const ready = o.status === "ready";
  const next = ready ? "Mark preparing" : "Mark ready";
  return `<li class="row">
    <div class="row__main">
      <div class="row__title">Order ${escapeHtml(o.orderId)} · ${escapeHtml(o.customerName)}</div>
      <div class="row__sub">driver ${escapeHtml(o.driverName)} · <span class="plate">${escapeHtml(o.plate)}</span></div>
    </div>
    <div class="row__right">
      <span class="badge badge--${escapeAttr(o.status)}">${escapeHtml(o.status)}</span>
      <button class="btn btn--go" data-order="${escapeAttr(o.id)}">${next}</button>
    </div>
  </li>`;
}
The vehicle row follows the same shape (its button carries data-vehicle), while the
Matched and Delayed rows are read-only variants with no button — the delayed row, for
example, just shows the order and how long the driver has been waiting. The order and vehicle
toggle buttons post to the app’s small control
endpoints (POST /api/orders/:id/toggle, POST /api/vehicles/:plate/toggle, POST /api/reset),
which run plain UPDATE statements against PostgreSQL and MySQL and record
each one in the SQL log the page shows. So a click becomes a database change that Drasi observes
through CDC, re-runs the affected queries, and the SSE reaction pushes the shaped change back to
the browser — closing the loop, all on the same page.
Clean Up
When you’re finished, stop the app with Ctrl+C, then remove the database containers:
# Stop containers, keep data
bash scripts/cleanup.sh

# Stop containers and delete the data volumes
bash scripts/cleanup.sh --volumes
What You Learned
- Sources connect Drasi to live data — here, two of them at once: PostgreSQL via
logical replication and MySQL via its binary log, both embedded in a single Node app with
@drasi/lib. - Continuous Queries with a synthetic join relate rows across two completely separate
databases (
vehicles.plate = orders.plate), anddrasi.trueForadds real-time temporal logic — the delay fires exactly when the threshold is crossed, with no polling or timers of your own. - Reactions turn query changes into action. Drasi’s SSE reaction (
kind: sse) shaped each change with Handlebars templates and streamed it over Server-Sent Events to a custom UI — full control over the markup, with no reaction code of your own. - One integrated UI both drives the changes (plain SQL
UPDATEs that Drasi observes through CDC) and shows them live, so the whole “two independent systems, one live view” story fits on a single page.
From here, try changing the delay threshold, editing the Handlebars templates, adding another
cross-source query, or pointing the app at your own data — it’s all in one file, index.mjs.
Feedback
Was this page helpful?
Glad to hear it! Please tell us how we can improve.
Sorry to hear that. Please tell us how we can improve.